
The most common frustration with AI image editing is asking for one small change and getting a different picture back: you wanted a new mug, but the background, the lighting and everything else on the table shifted too. GPT Image 2.6 adds Mark up / select area to Image to Image mode for exactly this:
- Select area: paint over the region to redraw, and the model redraws only that part.
- Mark up: draw circles, boxes or arrows on the image, and the model reads them as editing instructions.
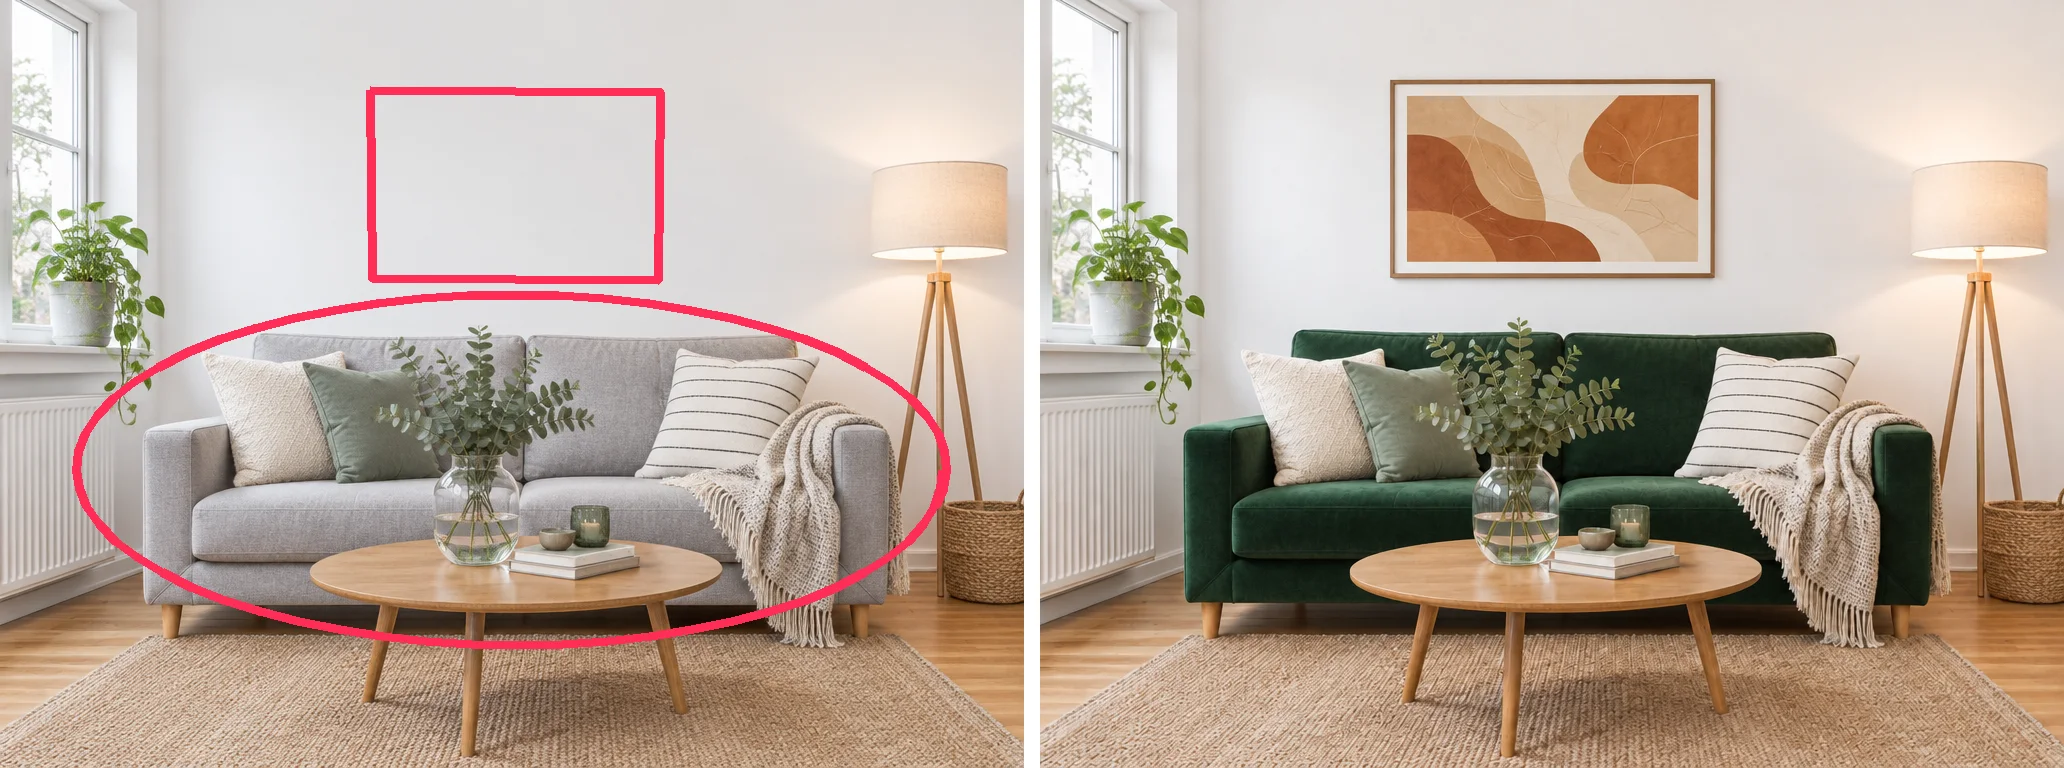
Left: the original with markup. Right: the result from a single generation. The circled sofa was replaced, a print appeared in the box, and the red lines are gone.
We generated all five examples in this tutorial ourselves, including one result that went wrong and how we fixed it.
Where to find Mark up / select area
- Open the GPT Image 2.6 page and switch to Image to Image.
- Upload the image you want to edit as the first reference image. Markup and selections apply only to the first reference.
- Click Mark up / select area below the reference uploader to open the editor.
- Pick Mark up or Select area at the top and draw with the brush. There are small, medium and large brush sizes, plus Undo and Clear.
- Click Use this layer. The layer uploads, and the generator shows that a selection or markup layer is attached.
- Describe the change in your prompt, then generate.
A few limits:
- Only one layer at a time; you can't combine markup and a selection.
- The first reference image can be at most 4096×4096.
- Phone photos stored sideways (with an EXIF rotation tag) are turned upright first, so your strokes land in the right place.
- Your strokes are saved with the draft, so you can click Edit later and keep drawing.
- Image to Image is billed by actual usage; the generator tells you the minimum balance before you generate.
Example 1: Swap a product
Start with the classic request: replace the white mug in a product shot with a different one. In Select area mode, paint over the mug:
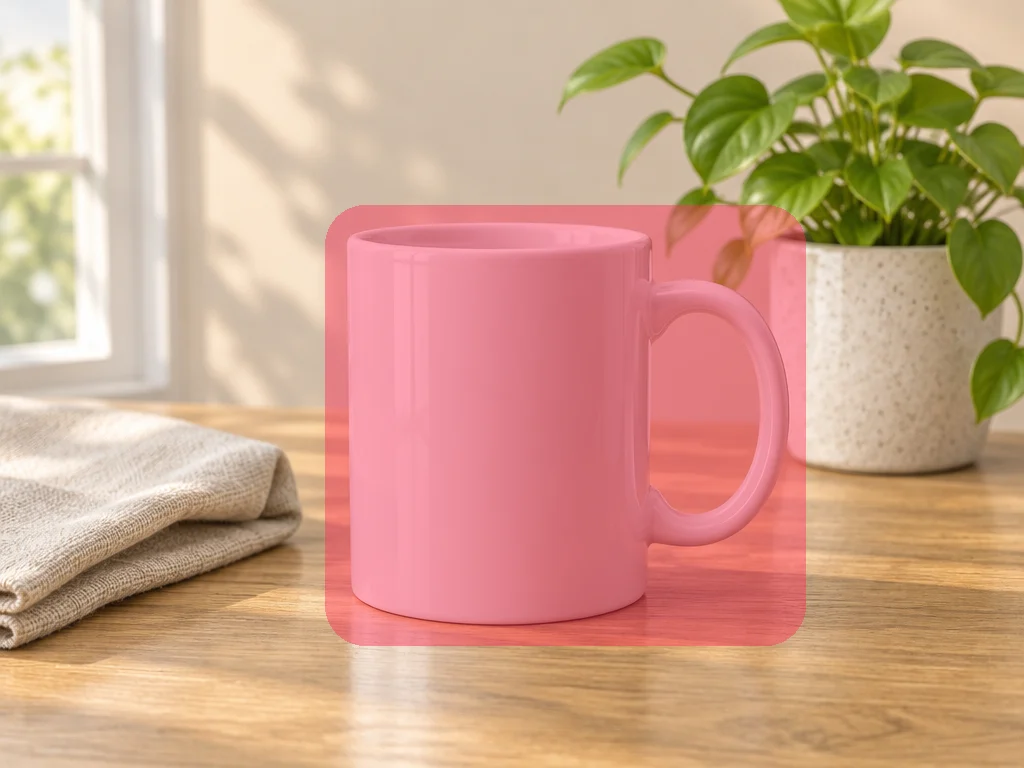
The red area is the selection (shown as translucent red here so it's easy to see).
Replace the mug in the selected area with a matte navy-blue ceramic mug with a thin gold rim, same size, same position and same viewing angle, lit by the same soft window light from the left.
Keep everything outside the selected area unchanged.
We also ran a control: the same image and a similar prompt without a selection. Side by side:
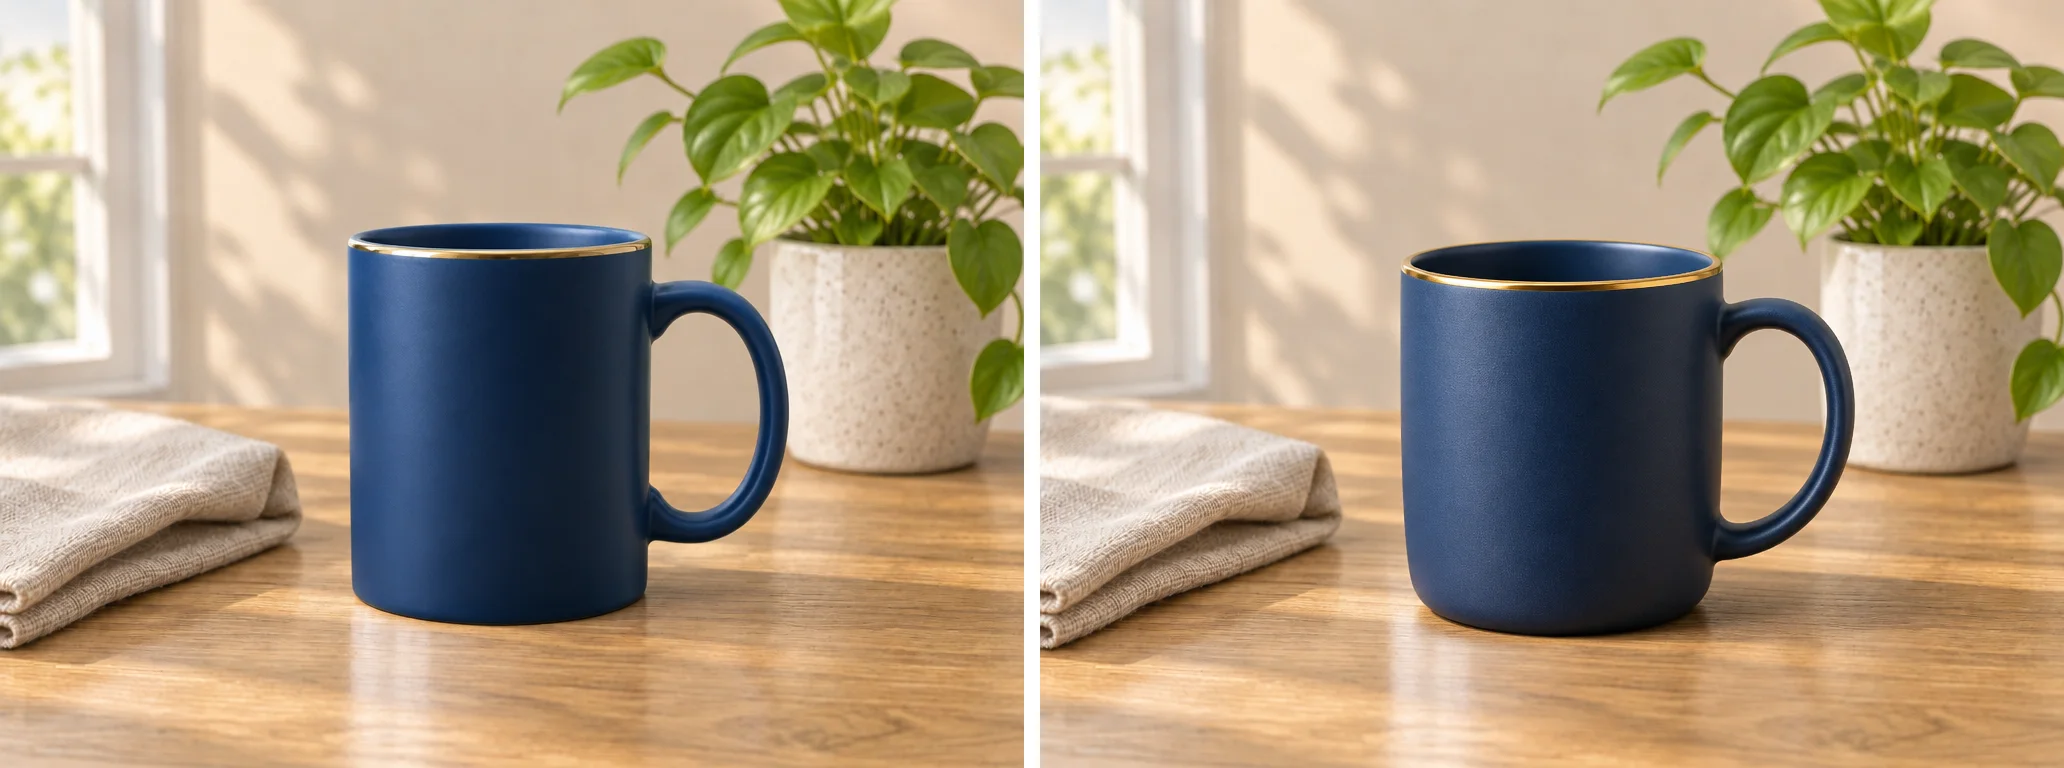
Left: no selection. Right: with a selection.
Two findings:
- Neither result touched the background. Compared pixel by pixel with the original, the area outside the mug is almost identical in both: the window, the plant, the napkin and the wood grain all stayed put. When there is one obvious target, GPT Image 2.6 can change just that thing from the prompt alone.
- The size of the selection shapes the new object. To be safe we painted a generous selection, and the new mug grew wider to fill it. If you want to keep the original size, paint snugly around the object, leaving only a thin margin.
So when does a selection actually help? See the next example.
Example 2: Several similar objects
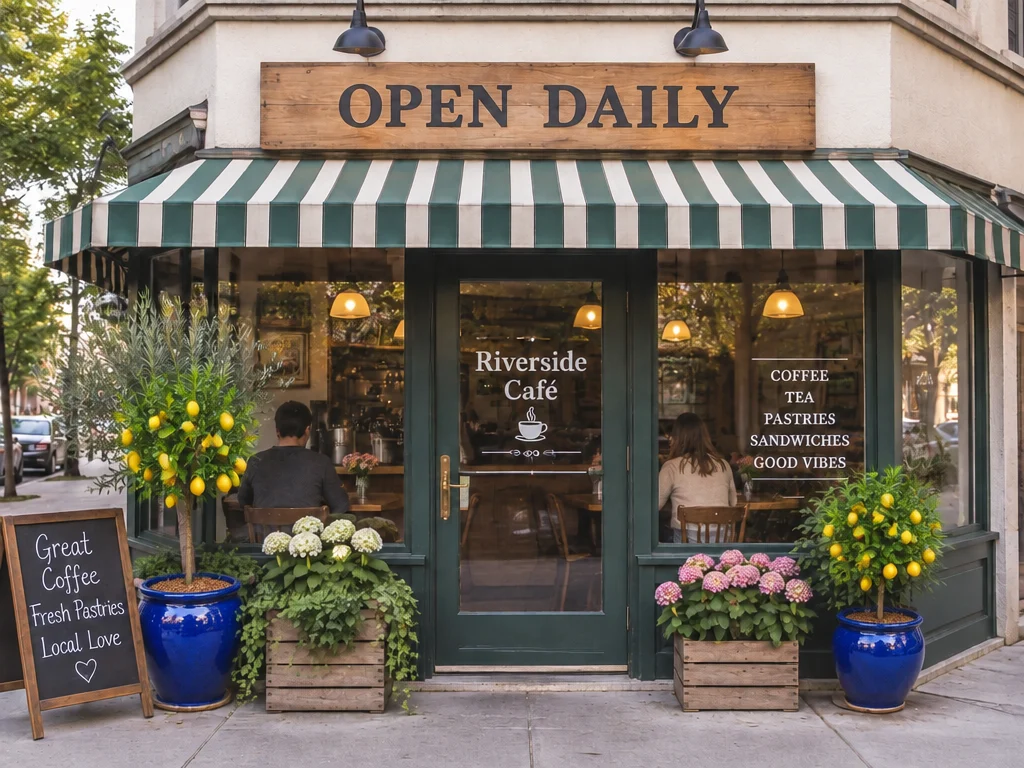
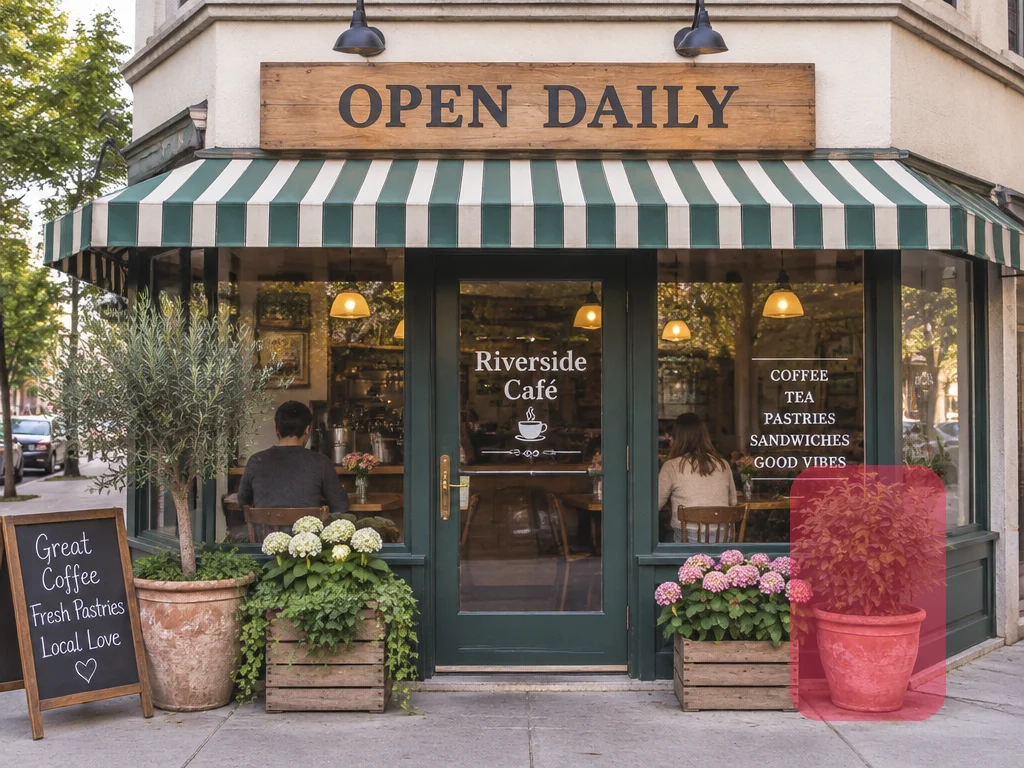
This café storefront has two plants in terracotta pots: an olive tree left of the door and a leafy shrub on the right. We only want to replace the one on the right.
First, no selection, with the prompt "replace the potted plant with a lemon tree":
Both plants became lemon trees. The model couldn't tell which one you meant, so it changed both.
This is where a selection earns its keep. Paint over the plant on the right:
A failure: the prompt never mentioned the selection
On our first try with the selection, we kept the same prompt ("replace the potted plant with a lemon tree, keep everything else unchanged") and didn't mention the selection. The result was strange:
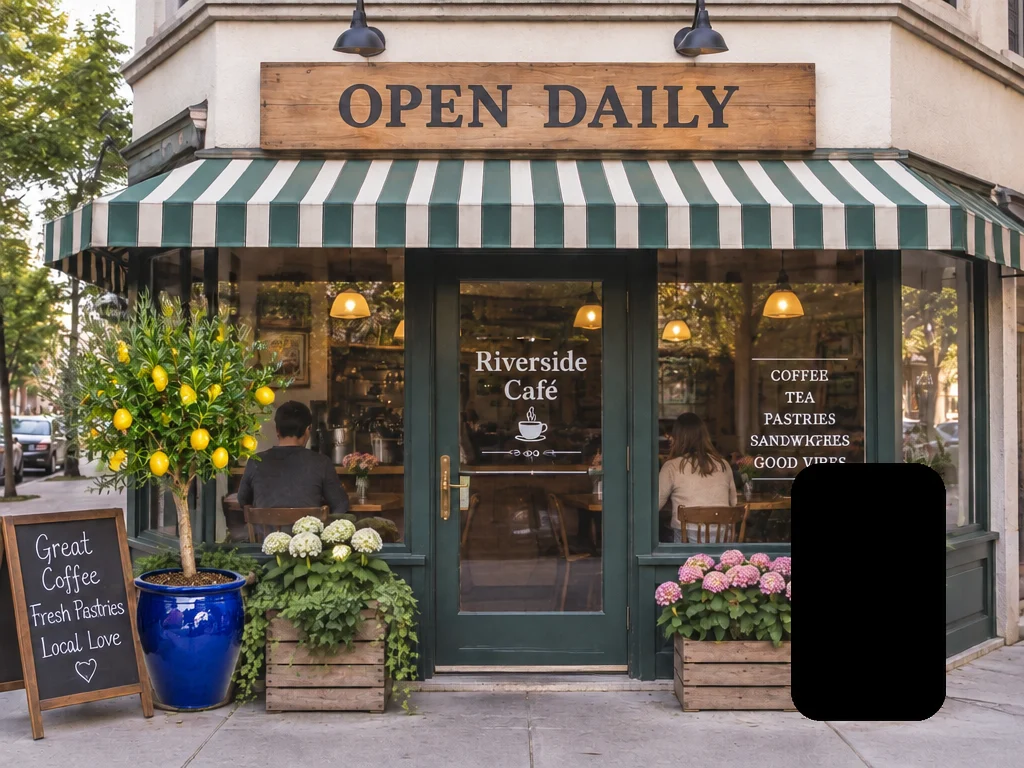
The selected area turned into a black block, and the olive tree on the left, which should have stayed, became a lemon tree.
The fix: say "selected area" in the prompt
We changed the prompt to "In the selected area, replace the potted plant with … Keep everything outside the selected area unchanged."
In the selected area, replace the potted plant with a small lemon tree with bright yellow lemons in a glossy cobalt-blue ceramic pot.
Keep everything outside the selected area unchanged.
We ran the same image and selection twice more. Both times only the plant on the right changed, and the olive tree stayed:
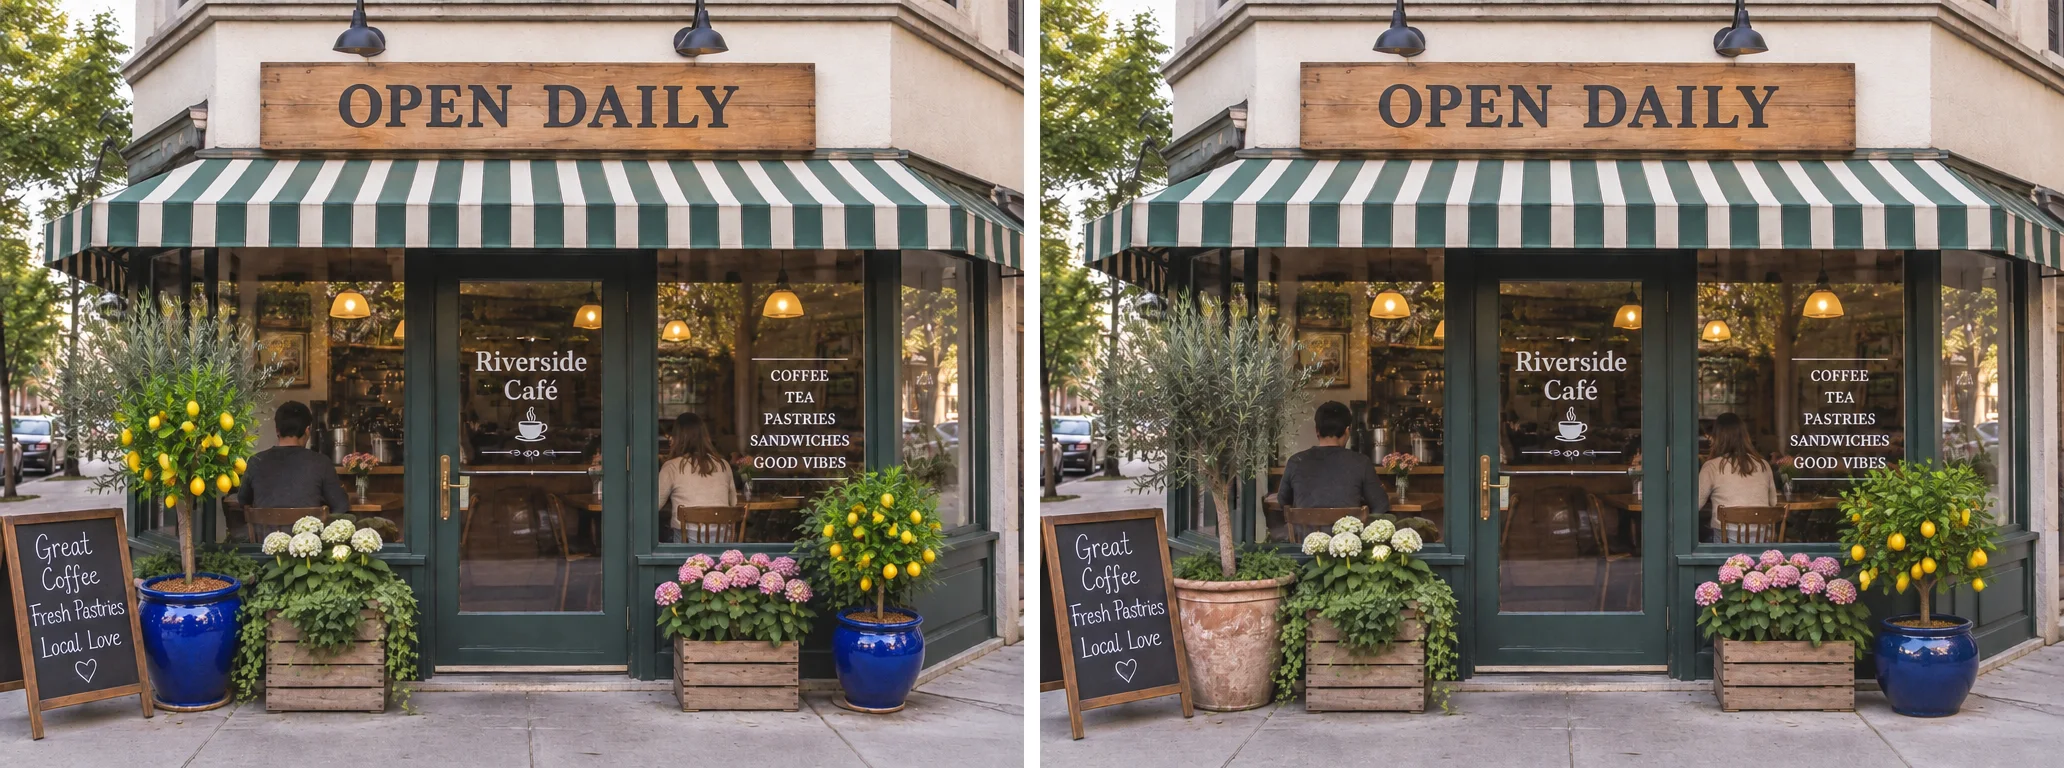
Left: no selection. Right: a selection, with "in the selected area" in the prompt.
That's only a handful of runs, so we can't say leaving the phrase out always fails. But it costs nothing to add: whenever you use a selection, write "in the selected area …" and "keep everything outside the selected area unchanged" in the prompt. Every other selection example in this post uses that wording, and each worked on the first try.
Example 3: Change the text on a sign
To change "OPEN DAILY" on the sign to "FRESH BREW", select just the sign board:
Change the wording on the wooden sign in the selected area to "FRESH BREW".
Keep the same weathered wood board, the same dark serif lettering style, size and centered alignment.
Keep everything outside the selected area unchanged.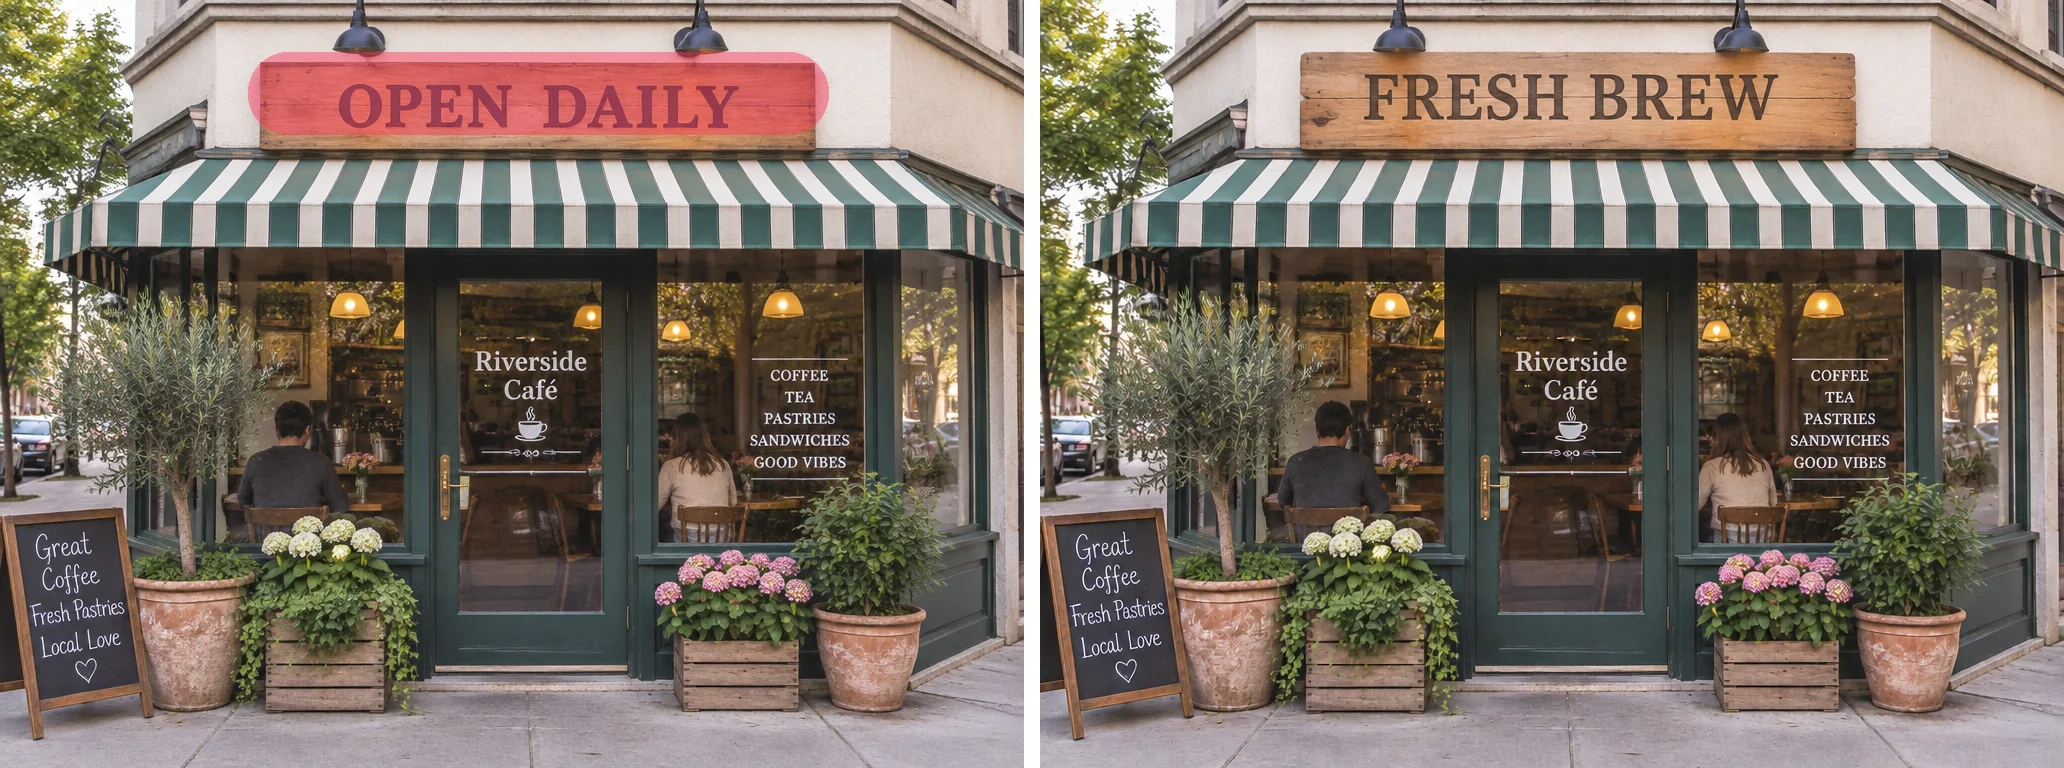
The new wording is spelled correctly, and the wood texture, lettering style and centered layout match the original. The "Riverside Café" lettering and the menu on the windows, as well as the chalkboard handwriting in the bottom left, are unchanged.
When you change text, describe the lettering style, size and layout too, or the model may switch to a different font.
Example 4: Remove a photobomber
Strangers in travel photos are a common annoyance. Select the person in the background:
Remove the man walking in the selected area.
Fill the area with the calm sea, the gentle shoreline waves and the wet sand that continue naturally from the surroundings, with the same golden-hour light.
Keep everything outside the selected area unchanged.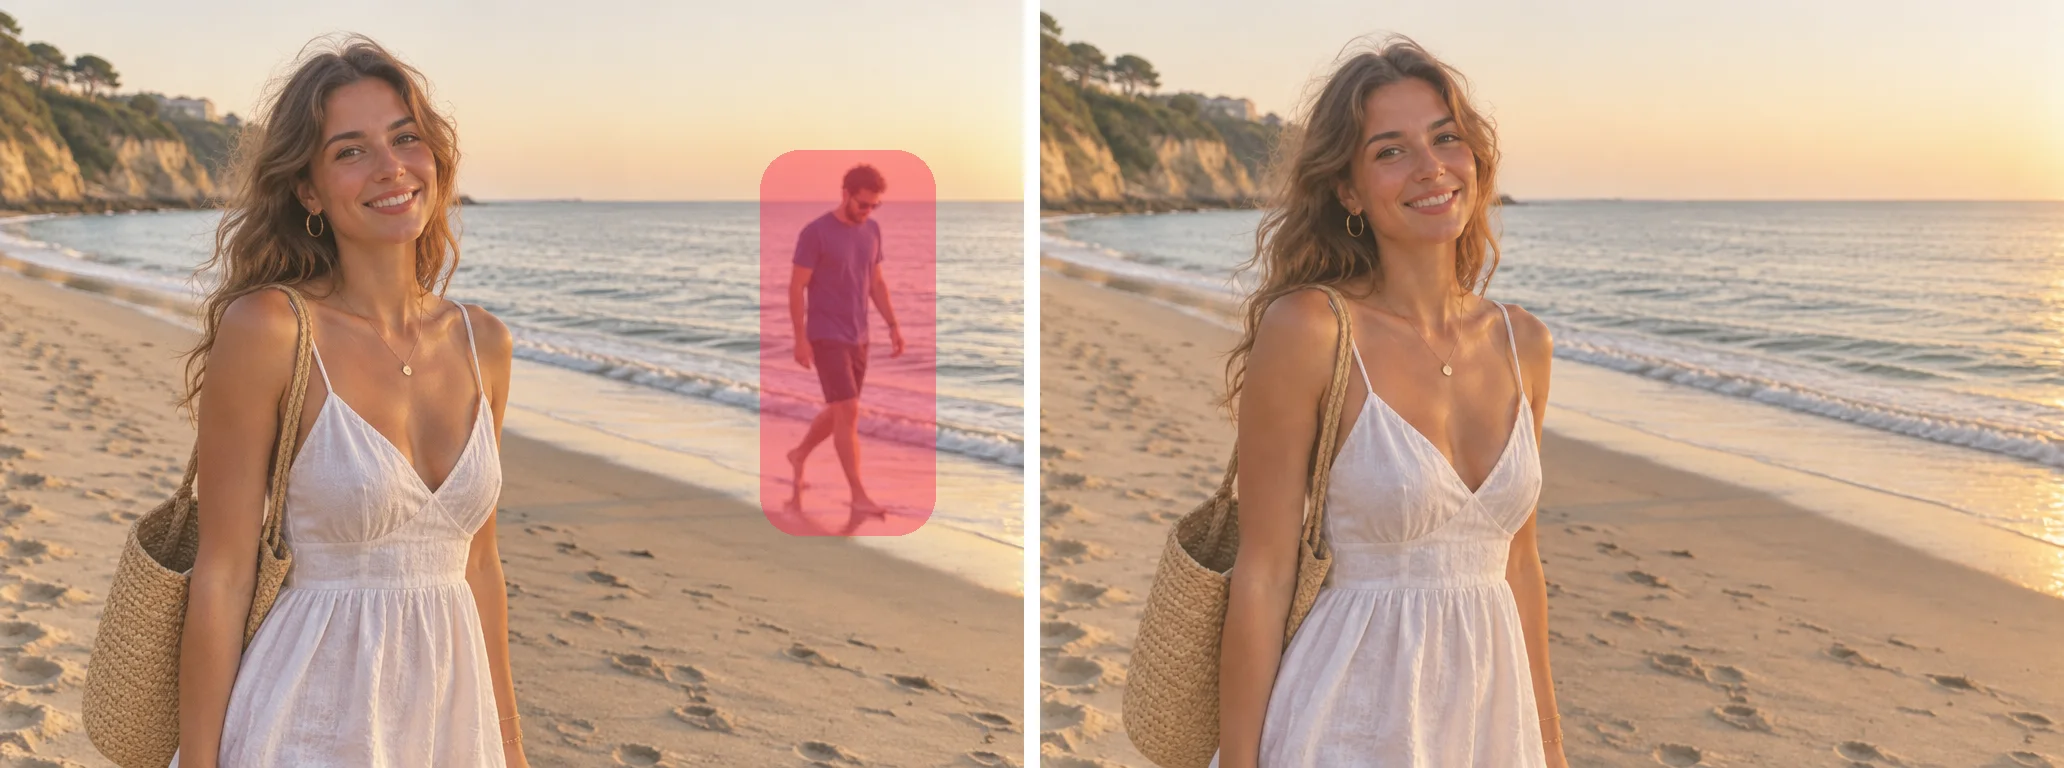
The passerby is gone, and the sea, waves and wet sand blend in naturally. The woman in the foreground, including her face, hair and dress, is unchanged. Removing things is where a selection fits best. With only a prompt like "remove the person in the background", the model may also touch up the person in front.
Example 5: Two edits at once with markup
A selection only tells the model where to change. Markup can also say what to change, and you can mark several places at once. We drew a red circle and a red box on a living room photo:
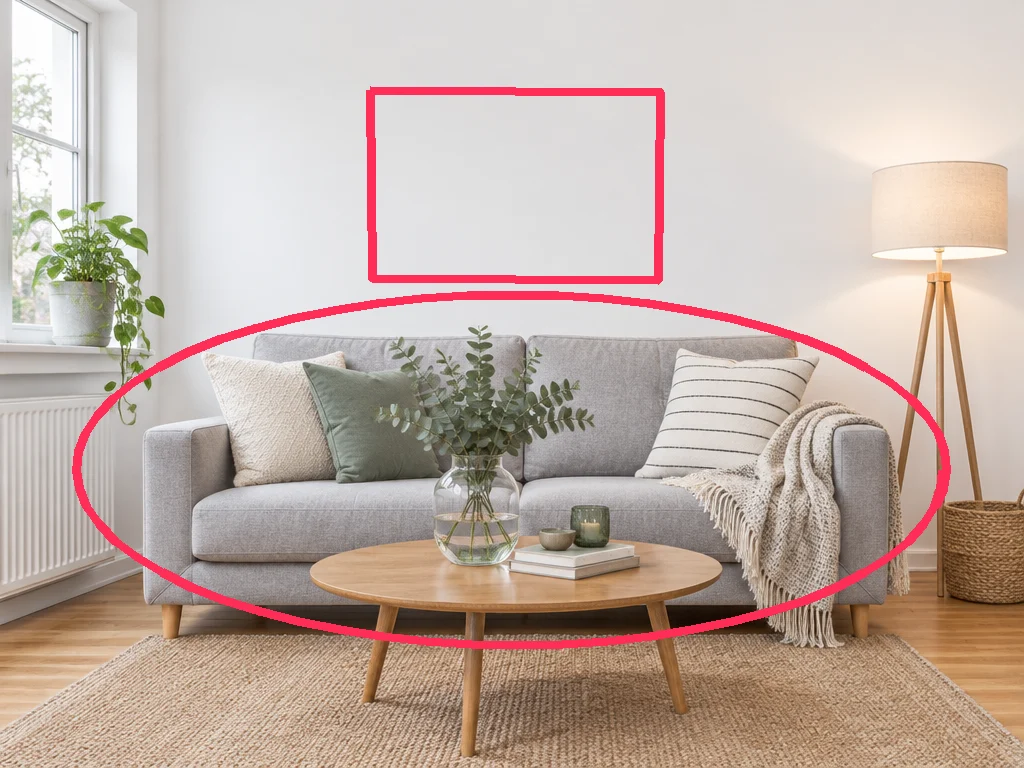
Then we numbered each mark in the prompt and explained what it means:
Follow the red markings on the image, then remove the markings themselves:
1) replace the circled grey sofa with a deep green velvet sofa of the same size and position, keep the pillows, the throw blanket and the coffee table;
2) inside the rectangle drawn on the wall, hang a large framed abstract art print in warm beige and terracotta tones.
Keep the rest of the room unchanged. No red lines in the result.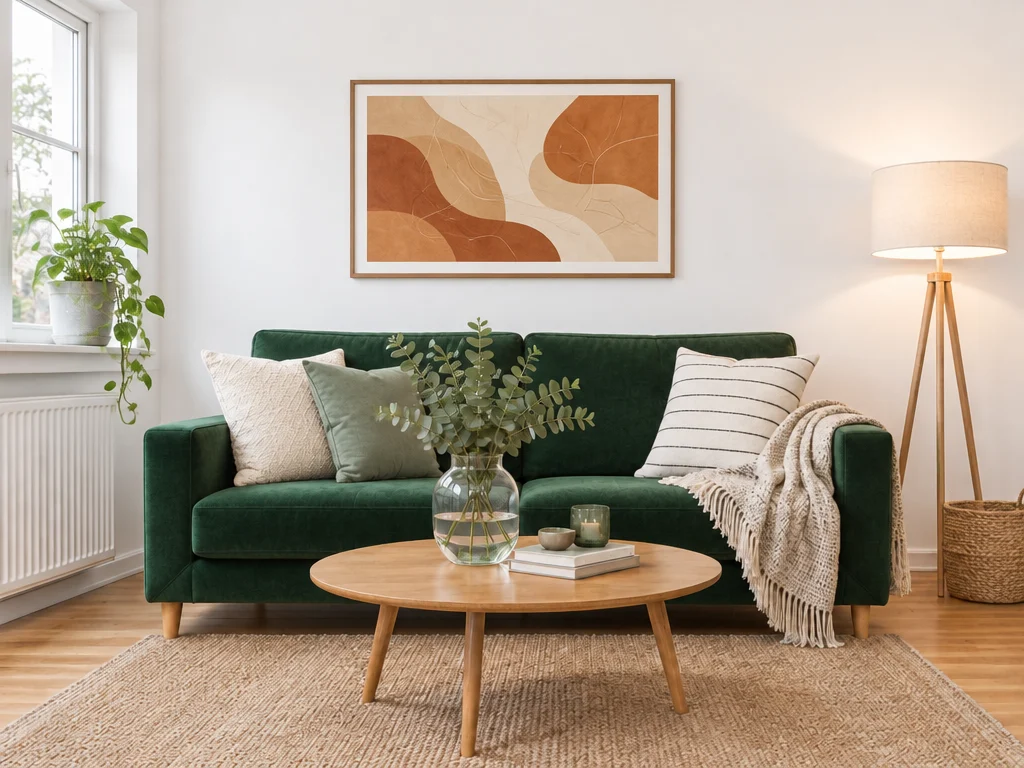
Both edits landed. The circled sofa is now green velvet, with the pillows, blanket, coffee table and vase still there. A print hangs where the box was, at about the box's size. The last line, "No red lines in the result", worked too; no marks remain.
Tips for markup prompts:
- Explain every mark: "the circled …", "inside the rectangle …", so the model knows what each one means.
- Ask for the marks to be removed: "then remove the markings themselves", "no red lines in the result".
- Use different shapes for different jobs: for example a circle for "replace this", a box for "add something here" and an arrow for "move it here". It's less ambiguous than circling everything.
Selection, markup or prompt only?
| Situation | Use | Why |
|---|---|---|
| One obvious target (change the mug's color) | Prompt only | GPT Image 2.6 already changes just that thing; it's the least work |
| Several similar objects, change only one | Select area | Without it, the model may change all of them |
| Remove people or clutter | Select area | It limits the change, so the foreground isn't touched |
| Change text on a sign or package | Select area | Only the text is redrawn; the surrounding details stay |
| Several edits at once, or add something to an empty spot | Mark up | You can point to the place and say what to do |
| Hard to describe the location ("second from the left") | Mark up | Drawing it is more precise than describing it |
Prompt templates
Select area:
In the selected area, replace [the original object] with [the new object, with material and color].
Keep the same [size / position / angle / lighting].
Keep everything outside the selected area unchanged.
Mark up:
Follow the red markings on the image, then remove the markings themselves:
1) replace the circled [object] with [new object];
2) inside the rectangle, add [new object].
Keep the rest unchanged. No red lines in the result.
Troubleshooting
| Problem | Fix |
|---|---|
| The selection turns into a black block, or something else changes | Write "in the selected area …" and "keep everything outside the selected area unchanged" |
| The new object is bigger or a different shape | Paint the selection snugly around the object and say "same size and position" |
| Visible seams at the selection edge | Leave a small margin around the object and mention the light direction |
| Red marks remain in the result | End the prompt with "No red lines in the result" |
| A mark was misunderstood | Number each mark and explain it; use circles, boxes and arrows for different instructions |
| Mark up / select area is missing or disabled | Make sure the model is GPT Image 2.6, you're in Image to Image mode, and a reference image is uploaded; GIF and SVG results can't be used as references |
| The image is too large | The first reference can be at most 4096×4096; shrink it with the Image Resizer |
Wrap-up
GPT Image 2.6 is already good at changing just one thing, so for simple edits a prompt is enough. Reach for Mark up / select area in these cases:
- Several similar objects, or you need to remove something: use a selection, and always write "in the selected area" and "keep everything outside the selected area unchanged".
- Several edits at once, or adding something to an empty spot: use markup, number each mark and explain it.
- Paint selections snugly around the object so the new one keeps the right size.
Want to apply this to real work? Continue with the e-commerce product photo tutorial, the interior design tutorial and the old photo restoration tutorial.