
GPT Image 2.5 is very good at precise edits: ask it to change one thing and it tends to leave the rest of the picture alone. That makes a fun idea possible — generate a short animation one frame at a time, changing only the pose each time, and play the frames back like a stop-motion film.
The idea works, with one catch. If every frame is made from the frame before it, small errors pile up: after a dozen or so frames, colors shift, the character grows or shrinks, and the background texture starts to crawl. This tutorial shows two workflows — a quick one for short clips and a layered one for longer clips — and then how to turn the frames into an MP4 with the free Images to Video tool, no editing software needed.
Our example is a 9:16 clip for TikTok, Reels or Shorts: a clay frog spots a cherry, hops over, tries to swallow it whole, and spits it back out. Here's the finished result: 10 frames at 6 fps, stitched together with the Images to Video tool.
Flare or Sunburst? Use both
GPT Image 2.5 comes in two versions, and a stop-motion clip needs both kinds of work:
- GPT Image 2.5 Flare is built for fast, everyday creation: trying things often and iterating. That's exactly what generating a dozen-plus frames, and rerolling a few of them, feels like.
- GPT Image 2.5 Sunburst is built for fine, detail-focused image editing. Use it where getting one image exactly right matters more than speed.
| Job in this tutorial | Model |
|---|---|
| Master shot, character master sheet, background plate | Sunburst |
| Generating the frames, pose by pose | Flare |
| Redoing a frame that drifted | Sunburst |
| Compositing a pose onto the background plate | Sunburst |
Rule of thumb: draft with Flare, fix with Sunburst. Both are in the model menu of the generator on the GPT Image 2.5 page, and you can switch for every single generation.
Step 1 — Plan your key poses and frame rate
Stop motion is choppy on purpose. You don't need 24 frames per second. You need a handful of clear poses and good timing.
| Frame rate | Frames for an 8-second clip | Feel |
|---|---|---|
| 4 fps | 32 | Jerky, comic-strip energy |
| 6 fps | 48 | Classic handmade claymation |
| 8 fps | 64 | Smoother, still clearly stop motion |
| 12 fps | 96 | Fluid ("on twos" in animation terms) |
You don't have to generate every one of those frames. At 6 fps, 12–20 unique poses are usually enough, because you can hold a frame (show the same image for 2–4 frames) on the moments that matter: the surprise, the punchline, the final pose.
Write the poses down before you generate anything. For our frog:
- Frog sits, idle · 2. Notices the cherry (hold ×2) · 3. Crouches · 4. Mid-hop · 5. Lands beside the cherry · 6. Opens its mouth wide · 7. Cherry inside, cheeks bulging (hold ×3) · 8. Eyes watering · 9. Spits the cherry out · 10. Cherry rolls away · 11. Frog looks embarrassed · 12. Grins at the camera (hold ×4)
That's 12 images and 18 video frames, about 3 seconds at 6 fps. Play the whole sequence twice and you have a 6-second loop.
Step 2 — Short clips (up to ~12 frames): master shot + one change per frame
2.1 Generate the master shot
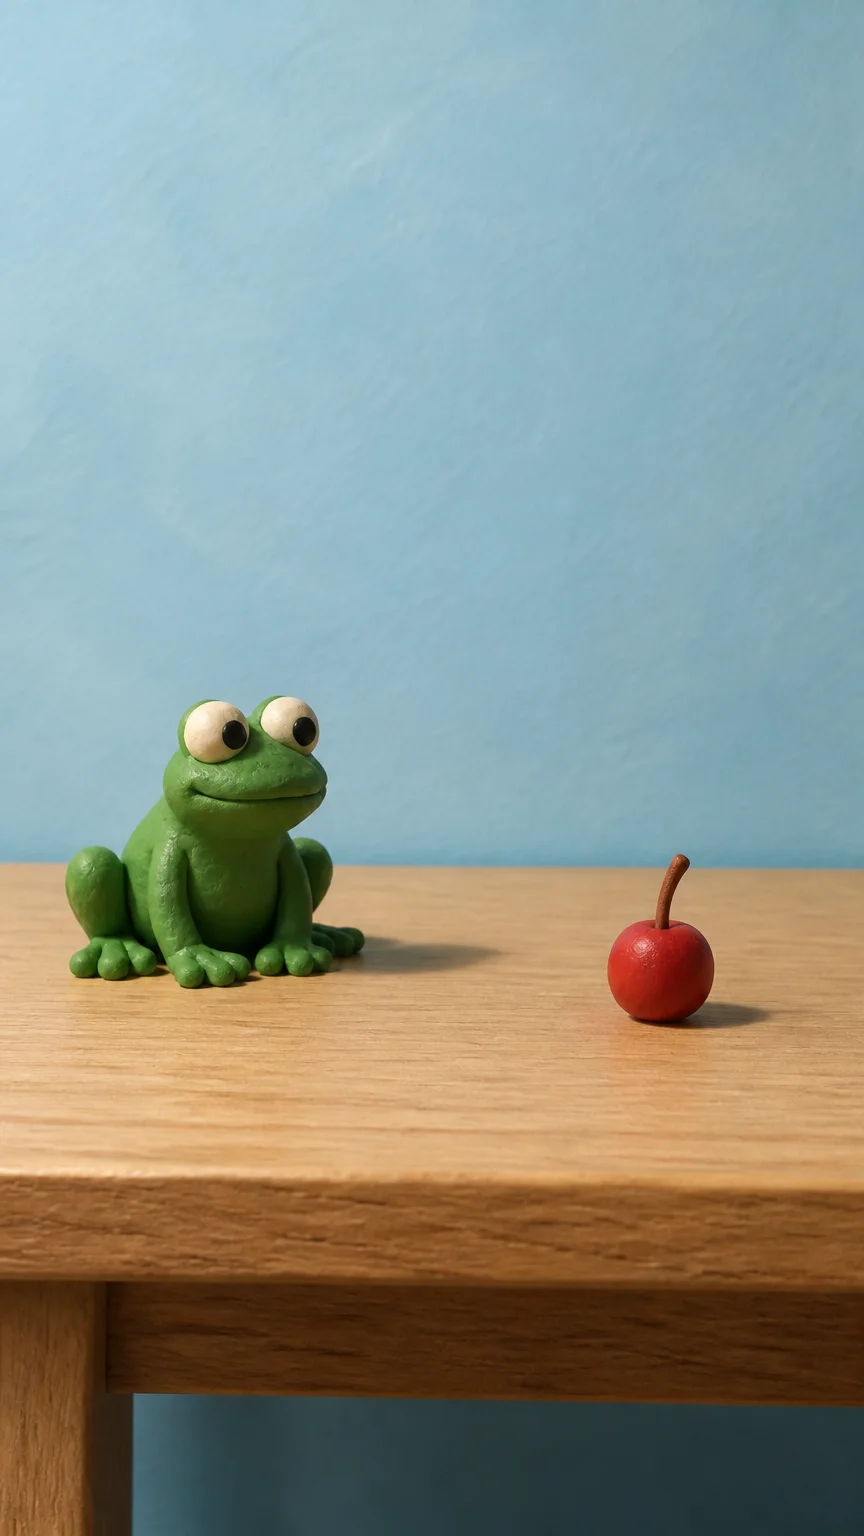
Open the GPT Image 2.5 page, switch the model to GPT Image 2.5 Sunburst, set the aspect ratio to 9:16 and the resolution to 2K, then generate the first frame. Spell out everything that must stay the same: camera, lighting direction, background and materials.
Stop-motion claymation still, vertical 9:16 frame.
Scene: a small handmade green clay frog sits on the left side of a light oak wooden desk. A single glossy red clay cherry with a short stem lies on the right side of the desk.
Background: a plain pastel blue wall, softly out of focus.
Camera: fixed, eye level with the desk surface, medium-wide shot, both the frog and the cherry fully in frame with generous space around them.
Lighting: soft key light from the upper left, gentle shadows falling to the right.
Material: matte clay with visible fingerprints and tool marks, real miniature-set feel.
No text, no watermark.
👉 Use this prompt: Remix the clay frog master shot (it opens with Flare selected, so switch to Sunburst before you hit Generate)
Reroll until you're happy. Everything after this depends on this frame, so a good master shot is worth a few extra tries. Download it and name it frame_01.png.
2.2 Make each next frame from two references
Now switch the model to GPT Image 2.5 Flare. This is the part where you generate a lot of frames and reroll some of them, which is what Flare is for.
Use two reference images for every new frame, in this order:
- Reference 1 = the master shot (
frame_01). It anchors the colors, scale and background, so errors can't build up from frame to frame. - Reference 2 = the previous frame. It gives the model the pose to continue from.
You can drag the reference thumbnails to put them in the right order. Then describe one change only:
Image 1 is the master shot. Image 2 is the previous frame.
Match image 1 for the camera angle, framing, desk, wall color, lighting direction, and the frog's size, colors and clay texture.
Take the frog's position and the cherry's position from image 2.
Change only this:
the frog turns its head toward the cherry and its eyes open wide.
Stop-motion claymation still, no text.
For each new frame, only the "change only this" line needs to change: "the frog crouches low, back legs coiled", "the frog is in mid-air above the desk"… Keep the aspect ratio on 9:16 every time (not Auto) so every frame comes out the same size.
⚠️ Don't ask the model to keep positions from image 1. In our test, an earlier version of this prompt said "keep the cherry exactly as in image 1". As soon as the frog had hopped across the desk, every new frame snapped it back to its starting spot and put the swallowed cherry back on the table. Use image 1 for the look (camera, set, colors, texture) and image 2 for where things are. If one frame still goes wrong after a reroll on Flare, redo just that frame on Sunburst.
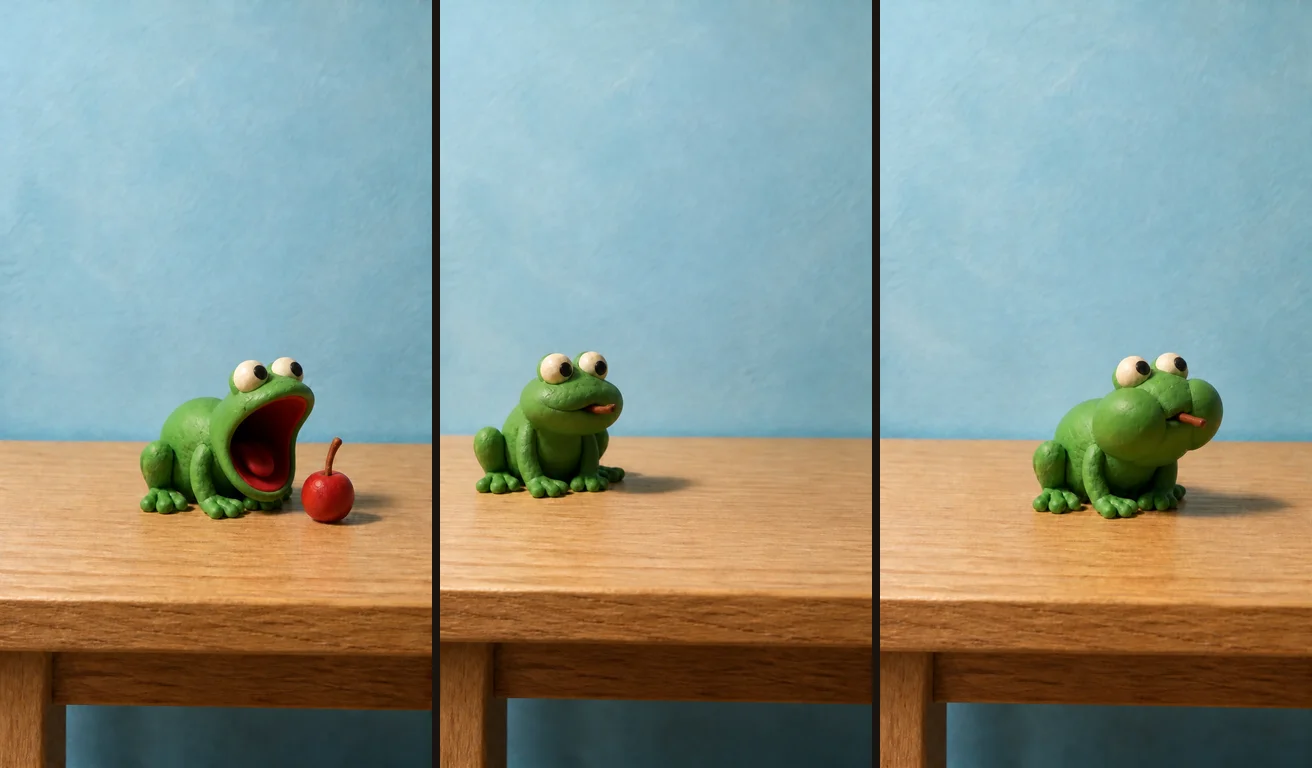
Left: previous frame. Middle: the old prompt sends the frog back to where it started. Right: the fixed prompt keeps it in place.
Tip: the Use as reference button under a result puts that image straight into the reference slot, so you don't need to download and re-upload while you work through the pose list.
Here are the frames we ended up using:
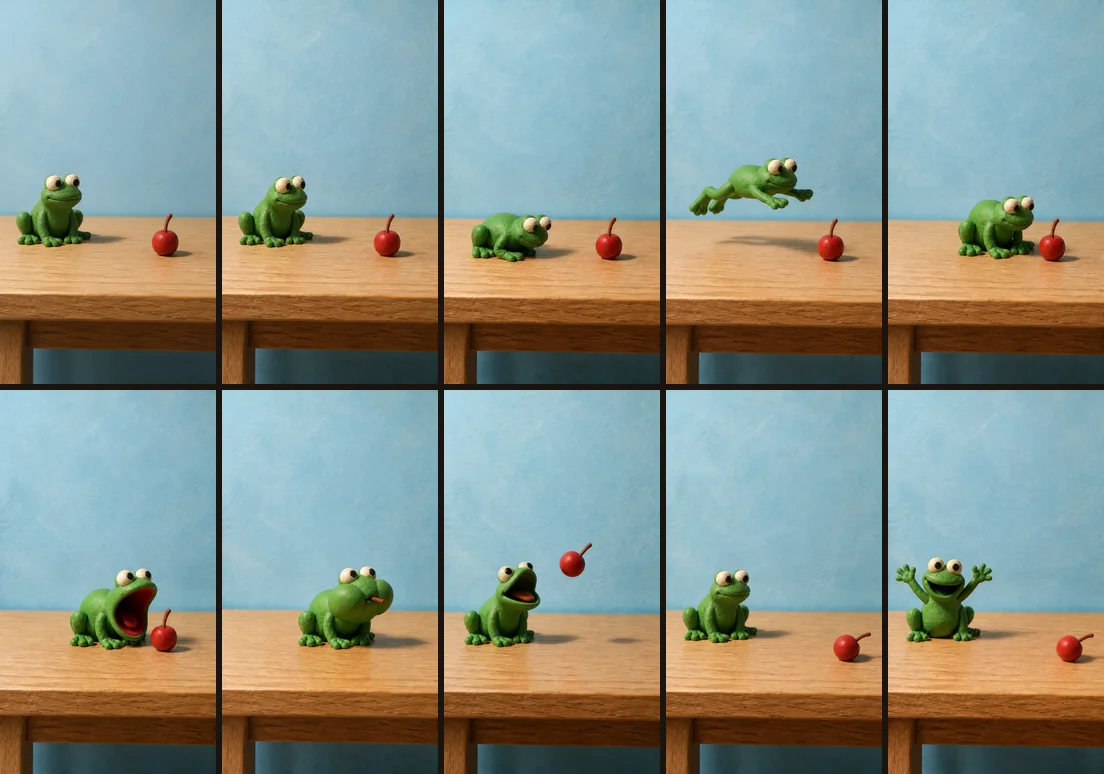
Three honest notes from making it:
- Expect a few retakes. The clip took 16 generations for 10 usable frames. (Our demo is 1K to save credits. 2K gives sharper frames.)
- Dropping a frame can beat rerolling it. If a pose keeps going wrong, cut it and hold the frame before it a little longer. Our "eyes watering" pose kept putting the cherry back on the desk, so we cut it and held the bulging-cheeks frame for 4 frames instead. Nobody misses it.
- Check every frame at full size. One of our frames had a frog scratching its head with one front foot while both front feet were still on the desk: three front legs. It's easy to miss in a thumbnail and obvious in the video, so we cut that frame too.
If the master shot is your only anchor, this approach stays stable for roughly 10–15 frames. For anything longer, use the layered workflow below.
Step 3 — Longer clips (30+ frames): background, character and props as separate assets
When every frame is made from the previous frame, each new image inherits that frame's mistakes and adds a few of its own. The fix is to stop chaining frames. Generate a few fixed master assets once, and build every frame from those masters only.
3.1 A fixed background plate
Generate the set with nothing in it, on Sunburst. You will reuse this exact image in every frame:
Empty miniature stop-motion set, vertical 9:16 frame.
A light oak wooden desk in front of a plain pastel blue wall, softly out of focus.
Fixed eye-level camera, medium-wide shot. Soft key light from the upper left.
Nothing on the desk, no characters, no props, no text.3.2 A character master sheet
A turnaround sheet locks the character's design from several angles. Make it on Sunburst too, since every pose will be built from it:
Character turnaround sheet for a stop-motion puppet:
a small handmade green clay frog with big round eyes, a pale yellow belly and visible fingerprints on the clay.
Show front, three-quarter and side views at the same scale, evenly spaced, on a plain light grey background.
Soft studio light from the upper left. No text labels, no watermark.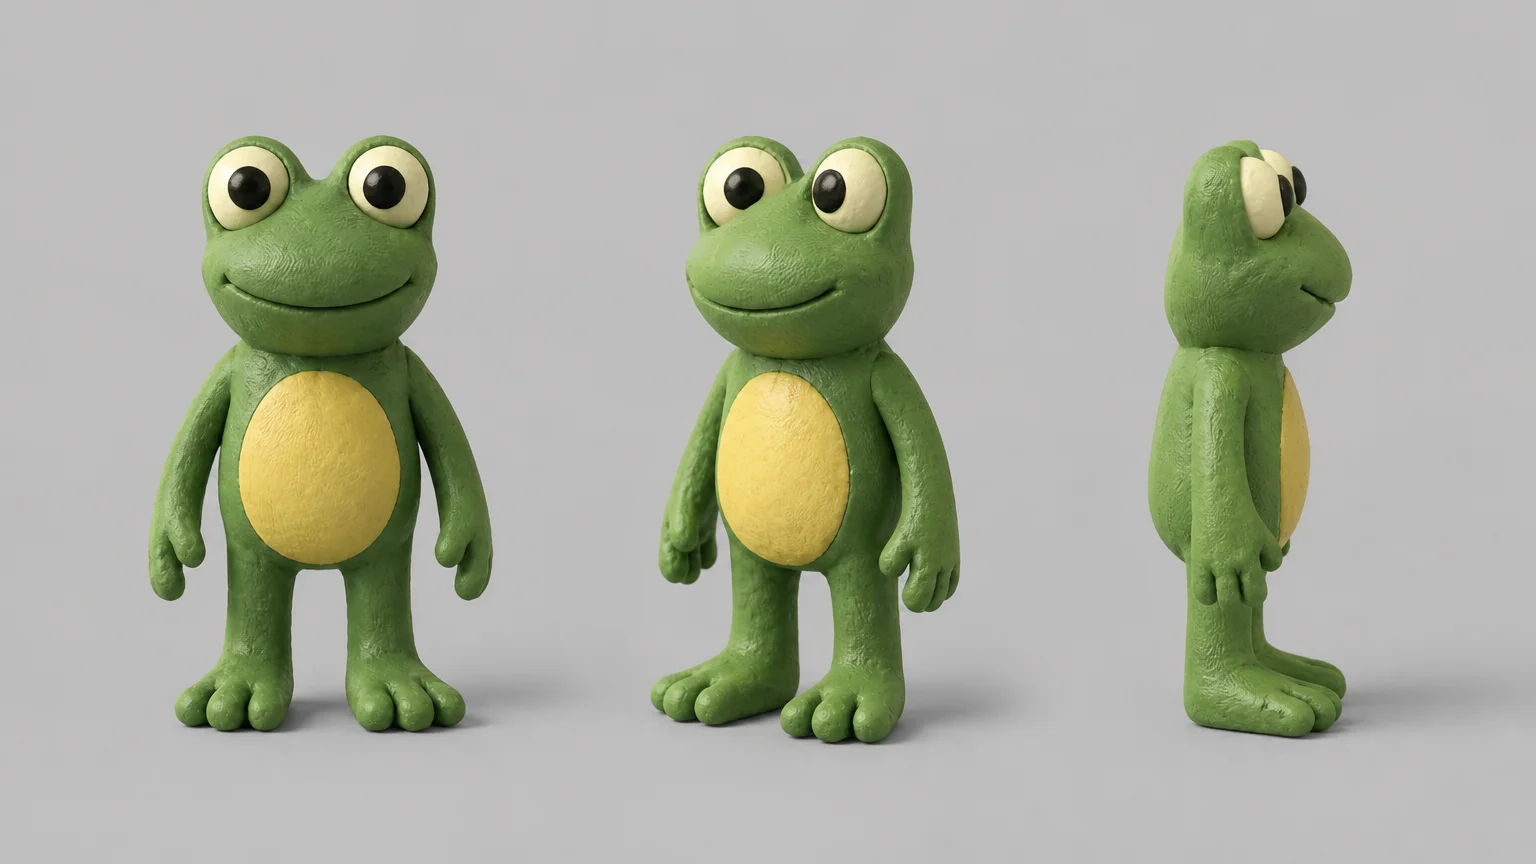
For a character with more detail, start from the Sci-Fi Explorer Design Sheet template and swap in your own character.
3.3 One image per pose, always from the master
Switch back to Flare, upload the master sheet as the reference, set Background to Transparent in the settings panel, and generate one image for each pose on your list:
Use the clay frog from the reference sheet: same colors, proportions, eye shape and clay texture.
Pose: crouching low with its back legs coiled, about to jump to the right.
Full body, three-quarter view, lit from the upper left, same scale as the reference.
Isolated subject, no shadow on the ground, no text.
Every pose is generated from the same master, not from the previous pose, so the 30th pose looks just as much like the frog as the first one. Props get the same treatment: generate a whole cherry once, then use it as the reference for a "squashed" or "bitten" version.
Why Transparent? A real alpha channel lets you place the character on the background plate without a white box around it. See the transparent background guide for why typing "transparent background" in the prompt isn't enough.
3.4 Put each frame together
There are two ways to combine the plate and the poses:
-
Let the model composite (easiest): on Sunburst, use the plate as reference 1 and the pose as reference 2.
Prompt Image 1 is the empty set. Image 2 is the frog. Place the frog from image 2 on the desk in image 1, standing on the left third of the desk surface. Do not change anything in image 1: same camera, wall, desk texture and light. Keep the frog's pose, colors and size exactly as in image 2, and add a soft contact shadow under it that falls to the right.Each frame still comes from the same fixed masters, so small differences don't add up over the clip.
-
Layer them yourself (most stable): stack the transparent pose PNG on top of the plate in any editor that supports layers (CapCut, Canva, Photoshop) and export each frame. The background won't move by a single pixel.
When you layer frames yourself, the character can look pasted on. Two things help: describe the same light direction in every pose prompt, and add a small soft shadow under the character in the place where it touches the desk.
Step 4 — Turn the frames into an MP4
You have a folder of frames. Now open the free Images to Video tool. It runs entirely in your browser, and your images are never uploaded.
- Drop all your frames in at once. They are sorted by file name automatically (
frame_2comes beforeframe_10). Drag a thumbnail to fix the order if you need to. - Pick a frame rate. 6 fps is the classic claymation look. The preview plays at the real speed, so try 6 and 8 and pick the one you like.
- Add holds. Click + under the key poses to hold them for ×2, ×3 or ×4 frames. Holds add rhythm without generating more images.
- Set the canvas. Choose 9:16 for vertical video and 1080p. If your frames don't match the canvas, pick Crop to fill or Fit inside.
- Repeat the sequence 2–3 times if you want a longer loop, then click Render video and download the MP4.
The clip at the top of this page used 6 fps, ×2 holds on the idle and noticing poses, ×3 on watching the cherry roll away, and ×4 on the bulging cheeks and the final grin. That's 10 images turned into 20 video frames, or 3.3 seconds, rendered in about a second.
The MP4 is H.264, so it plays on phones and uploads straight to social platforms. Add music or a "boing" sound effect afterwards in CapCut or in the platform's own editor.
Troubleshooting
| Problem | Fix |
|---|---|
| Colors shift a little more with each frame | You are chaining frames. Put the master shot back as reference 1, or switch to the layered workflow |
| The character slowly gets bigger or smaller | Add "same size as in image 1, same distance from the camera" to the prompt and keep the aspect ratio fixed |
| The background texture flickers | Reuse one background plate and only generate the character |
| The motion feels too fast | Lower the fps or add holds on the key poses, instead of generating more frames |
| The character looks cut out and pasted on | Match the light direction in every prompt and add a soft contact shadow |
| One frame keeps drifting even after rerolls | Redo just that frame on Sunburst, or cut it and hold the frame before it |
| You want smooth camera moves, water or cloth | That's a job for an image-to-video model. Stop motion's charm is that you control every single pose |
Wrap-up
Treat GPT Image 2.5 as your art department: it designs the character, the poses and the prop states. Flare handles the many drafts, and Sunburst handles the masters and the fixes. Leave the timing, position and layering to a fixed, repeatable process. In practice:
- Plan 12–20 key poses and decide where the holds go;
- Short clip: master shot (Sunburst) as reference 1, previous frame as reference 2, one change per frame (Flare);
- Long clip: background plate and character master (Sunburst) + transparent poses (Flare), never chaining frames;
- Stitch everything in the Images to Video tool at 6–8 fps.
Want a quick test before committing to a full clip? Make a 3x3 grid of poses with the sticker pack workflow, slice it with the Image Splitter, and drop the 9 tiles into the video tool. You'll have a rough 9-frame animation in a couple of minutes.